The library module manages all library-related activities, including book cataloging, issuing and returning books, tracking borrowers, and maintaining inventory. It helps streamline library operations for easy access and efficient management.
Create Library Staff #
Before Creating Member, User Group to be created. You can do this from User
Group>Create User group>
• Need to Create User, You can do this from User>Create>Select User group
For Creating Librarian Members do the following steps

- Click on the Library Accordion.
- Select Member.
- Toggle the switch to enable or disable the created member.
- Click to view details of the created member.
- Click to check the history of the member's details.
- Click to delete the created member.
- Click to create a new member.

- Select the Member Type (User Group) from the list. Based on the selected type, relevant fields will appear.
- Choose the appropriate Class.
- Select the Section.
- Choose the Student.
- Click Save to successfully create the member.
Book Category #
Create an Book Category: #

- Click the Library Accordion.
- Select Book Category.
- Enable or disable existing Book Category details.
- Edit the created Book Category.
- Delete the created Book Category.
- Create a new Book Category.
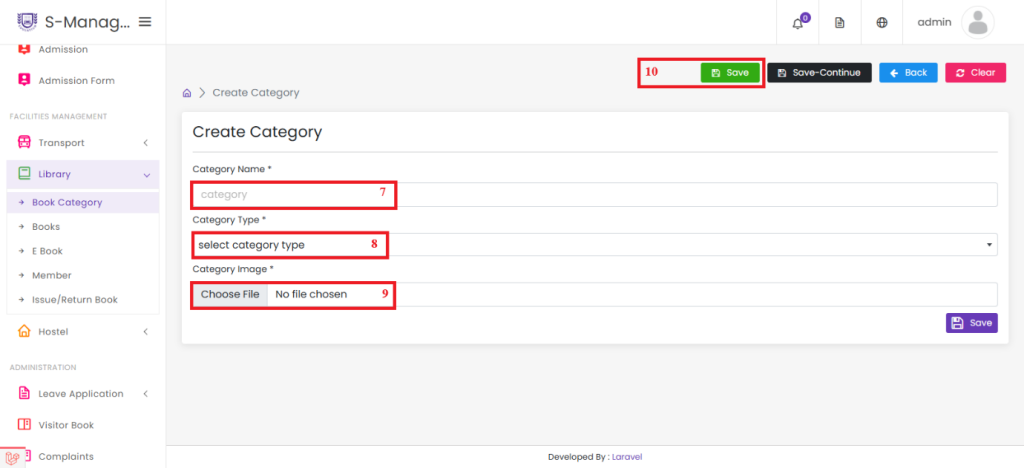
- Enter the Category Name – Provide a suitable name for the book category.
- Select the Category Type – Choose either Online or Offline based on your requirement.
- Upload the Category Image – Add an image that represents the category.
- Click Save – The book category will be created successfully.
Create Books #

- Click the Library Accordion – Expand the library section from the menu.
- Click on “Books” – Navigate to the book management section.
- Select the Current Status of the Book – Choose from the list: Active, Inactive, Damaged, Stolen, or Lost.
- Click “Edit” – Modify the details of an existing book.
- Click “View” – See the full details of a created book.
- Click “History” – View the historical details and changes related to the book.
- Click “Delete” – Remove the selected book from the system.
- Click “Create Book” – Add a new book to the library.

#
- Click the Library Accordion – Expand the library section in the menu.
- Click on “Books” – Go to the book management section.
- Select the Current Status of the Book – Choose from Active, Inactive, Damaged, Stolen, or Lost.
- Click “Edit” – Edit the details of an existing book (if needed).
- Click “View” – View complete details of a selected book.
- Click “History” – Review the history and updates of the book.
- Click “Delete” – Remove an existing book from the system.
- Click “Create Book” – Begin creating a new book entry.
#

- Select the Book Category – Choose the appropriate category for the book.
- Enter the Title of the Book – Provide the full name/title.
- Enter the ISBN Number – Add the International Standard Book Number.
- Enter the Publisher Name – Specify who published the book.
- Enter the Author Name – Enter the author’s full name.
- Enter the Quantity – Specify how many copies are available.
- Enter the Rack Number – Indicate where the book is stored.
- Enter the Description – Provide a brief overview or summary of the book.
- Enable “Recommended” (Optional) – Click to mark the book as recommended.
- Click “Save” – The book will be created and added successfully.
Create E Books #

#
- Click the Library Accordion – Expand the library section in the navigation menu.
- Click on “E-Books” – Navigate to the section for managing electronic books.
- Click “View” – See the details of already created E-Books.
- Click “Edit” – Modify the information of an existing E-Book.
- Click “Delete” – Remove an existing E-Book from the system.
- Click “Create E-Books” – Start the process of adding a new E-Book to the library.

- Select the Book Category – Choose the relevant category for the E-Book.
- Enter the Title of the E-Book – Provide the E-Book’s title.
- Enter the Author Name – Input the author’s name.
- Upload the Cover Image – Add a visual cover image for the E-Book.
- Upload the PDF Attachment – Attach the actual E-Book file in PDF format.
- Enable “Recommended” (Optional) – Click to mark the E-Book as recommended.
- Click “Save” – The E-Book will be created and saved successfully.
Issue and Returning Book in Library #
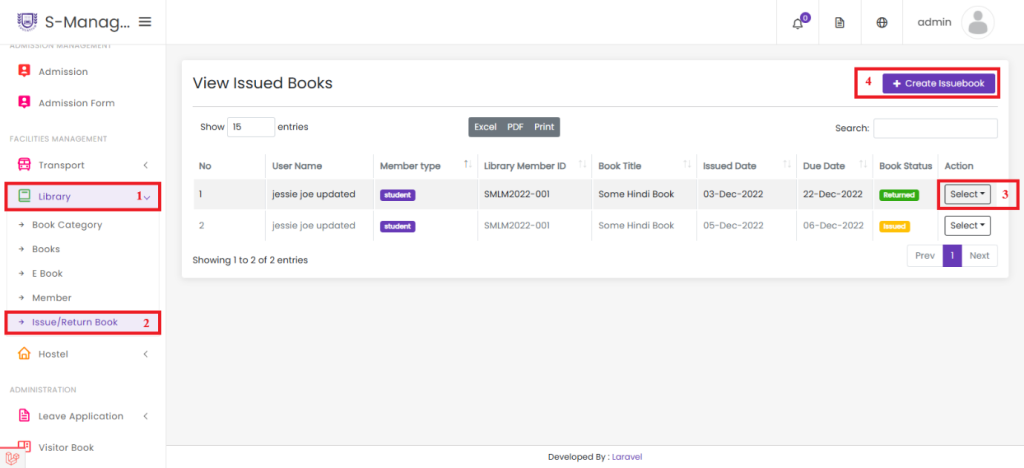
- Expand the Library section by clicking the accordion.
- Navigate to the "Issue/Return Book" option.
- Select the button that includes the Edit and Delete options.
- Click the "Create Issue Book" button to initiate the process.

- Choose a library member from the list.
- Select the book from the available options.
- Set the due date for the issued book.
- Click "Save" to successfully issue the book to the library member.


